NFS over RBD

Since CephFS is not most mature component in Ceph, you won’t consider to use it on a production platform. In this article, I offer a possible solution to expose RBD to a shared filesystem.
#I. Architecture
My choice was turned to NFS for a couple of reasons:
- Old but reliable
- Easy to setup
- Existing RA: exportfs and good support for the LSB agent
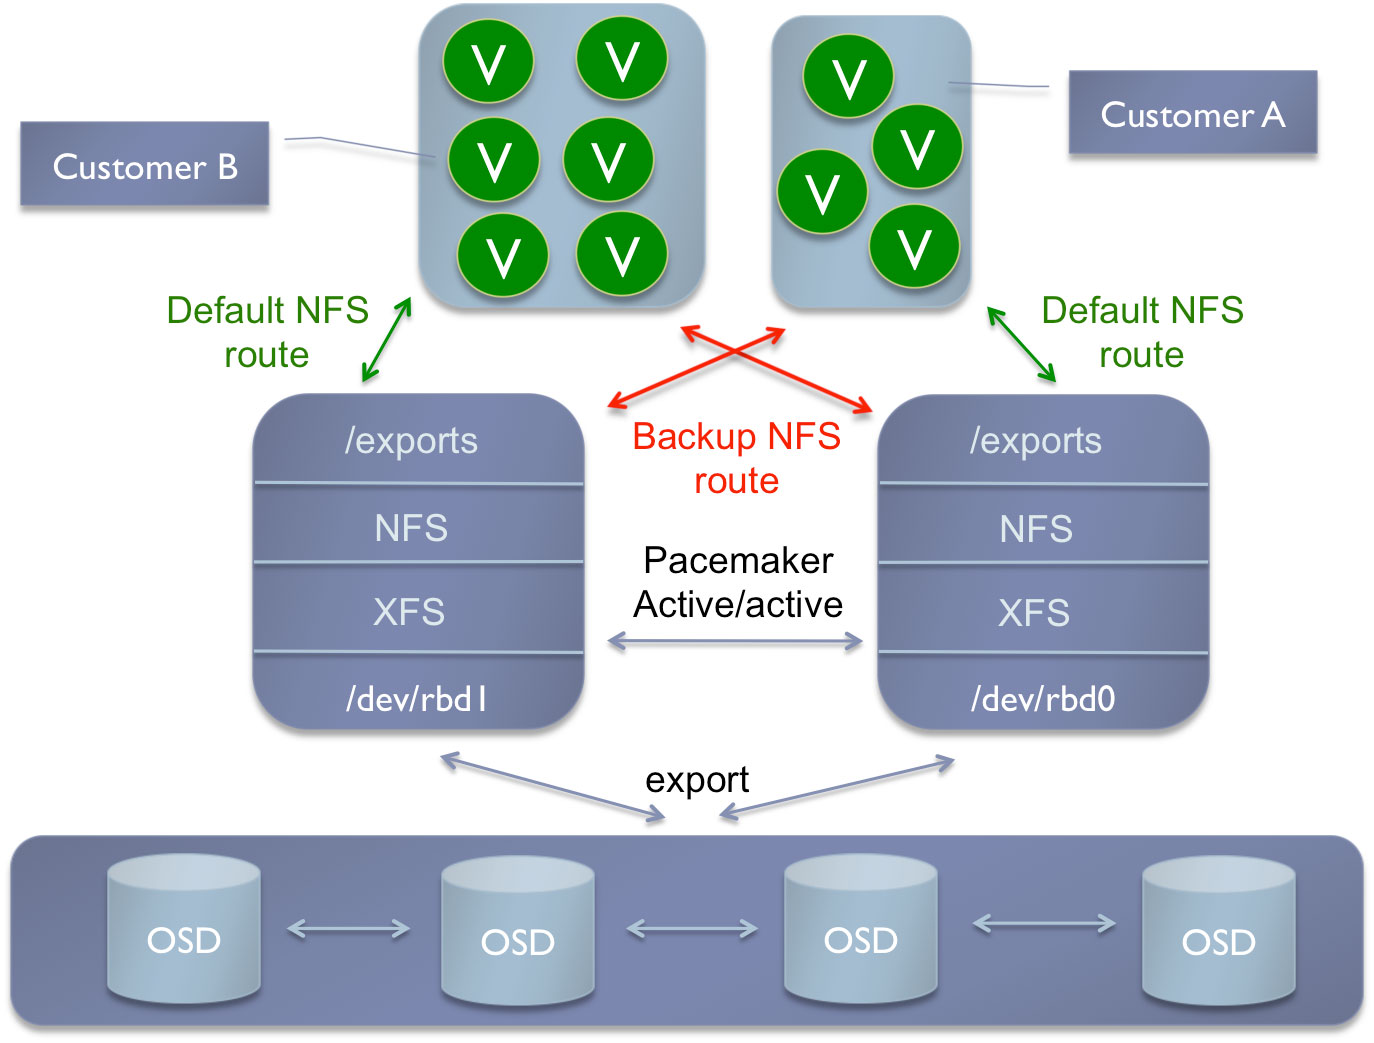
Overview of the infrastructure. For my own setup, I needed to map and export several pools. For examples you could have one pool for the customers data and one pool for storing your VMs (/var/lib/nova/instances). It’s up to you.

#II. Prerequisites
Install Ceph client packages and the NFS server, this needs to be performed on every nodes:
$ sudo apt-get install ceph-common nfs-server -y |
Nothing more, no modprobe rbd, nothing. Pacemaker will manage that for us :)
Create your RBD volumes:
$ rbd create share1 --size 2048 |
You will need to map it somewhere in order to put a filesystem on it:
$ sudo modprobe rbd |
And so on for share2.
In order to manage our RBD device we are going to use the RA written by Florian Haas for Ceph which map RBD device. You can have a look at it in the Ceph Github. Integrate the RA to Pacemaker:
$ sudo mkdir /usr/lib/ocf/resource.d/ceph |
Minor change to the resource agent. According to the official OCF documentation.
The pull request is waiting here.
#III. Setup
##III.1. Common
This initial setup only containts 2 nodes so you need to setup Pacemaker according to this number.
$ sudo crm configure property stonith-enabled=false |
Of course if you plan to expand your active/active with a third node, you must unset the no-quorum-policy.
##III.2. Primitives
In order to make things really clear I will setup the primitive from the bottom layer to the top, something like:
- Map the RBD device
- Mount it!
- Export it!
- Reach it with the virtual IP address
- Setup the NFS server
Note: for more comprehension and clarity I always name:
- the primitive with a
p_prefix - the group with a
g_prefix - the location rule with a
l_ - and so on for every parameters
All the operation needs to be performed within the crm shell or simply sudo crm configure before every commands below. You can also do sudo crm configure edit and copy/paste.
First, map RBD:
primitive p_rbd_map_1 ocf:ceph:rbd.in \ |
Second, filesystem:
primitive p_fs_rbd_1 ocf:heartbeat:Filesystem \ |
Third, export directories:
primitive p_export_rbd_1 ocf:heartbeat:exportfs \ |
Fourth, virtual IP addresses:
primitive p_vip_1 ocf:heartbeat:IPaddr \ |
Fith, NFS server:
primitive p_nfs_server lsb:nfs-kernel-server \ |
##III.3. Resources group and clone
Groups contain a set of resources that need to be located together, started sequentially and stopped in the reverse order. You need to create a group of resource for each NFS shared first and also for all the NFS dependencies services:
group g_rbd_share_1 p_rbd_map_1 p_fs_rbd_1 p_export_rbd_1 p_vip_1 |
Clones are resources that can be active on multiple hosts. We have to clone the NFS server, it will act as active/active. It means that the NFS daemon will be running/active on both nodes.
clone clo_nfs g_nfs \ |
##III.4. Location rules
In this setup, each export must run on a specific server, always. The resource will always remain in its current location unless forced off because the node is no longer eligible to run the resource. These 2 contraints define a Score to determine the location relationship between both resources. Positive values indicate the resources should run on the same node. Setting the score to INFINITY forces the resources to run on the same node.
location l_g_rbd_share_1 g_rbd_share_1 inf: nfs1 |
At the end, you should see something like this:
$ sudo crm_mon -1 |
Conclusion: here we have a scalable architecture, we can add as many NFS server (clone) as we need. This will expand the active/active mode. That was only one use case. You don’t necessary need active/active mode. An active/passive mode should be enough if you only need to map one RBD volume.
Comments